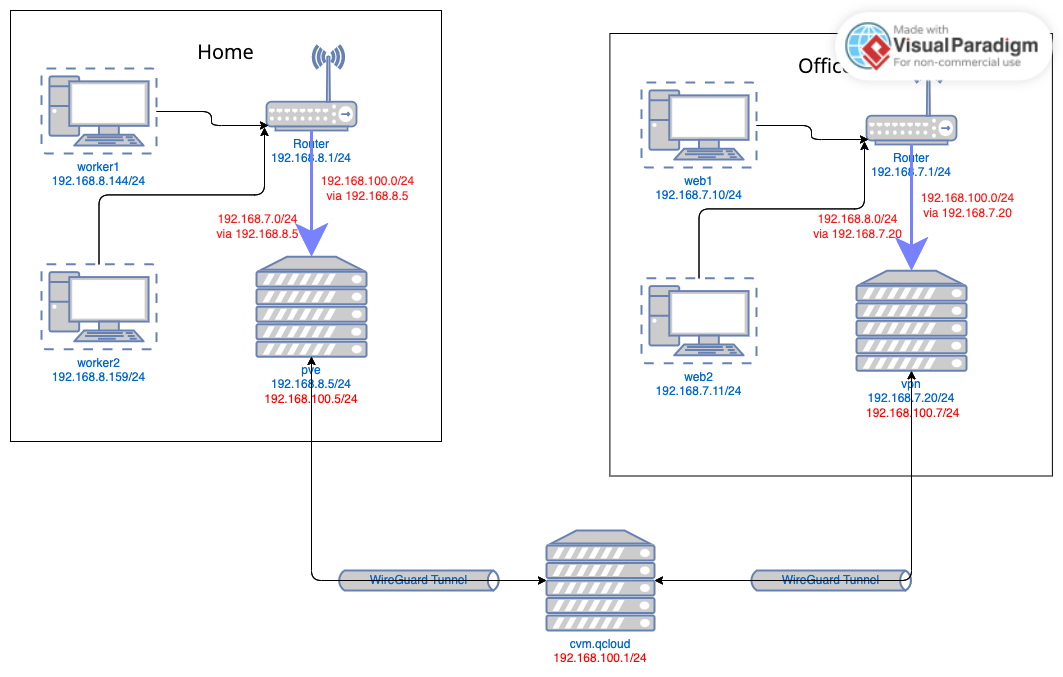
使用Wireguard连接家用和办公网络

前言:两处房子都有千兆光纤宽带,有时经常访问一下内部NAS和打印机,就想怎么用WG把两个内网打通,同理该方案也可以用在办公网和云VPC打通,实现办公网和云生产网络互联互通访问。我没有采用网关路由的方式,因为如果网关路由方式,需要两边都使用支持Openwrt的路由,之前有几个Huawei 556a路由器,可以刷Openwrt,可惜网络是百兆的,跑不到千兆,也买了一个友善R2S,运行了1~2天就死机了,不知道是不是放在弱电箱中散热不佳的原因;同时家里还有几个之前买的斐讯N1没什么用,正好可以把它用起来。该方案唯一的要求是家里的主路由器支持加自定义路由。
硬件要求:
- 一般家用千兆路由器(支持自定义路由)两台
- 斐讯N1两台,安装armbian linux操作系统
- 云服务器一台,安装Linux操作系统,CPU 2核4G就够用了,带宽根据情况选择,我买的是动态带宽
WG安装和生成密钥
以下过程在云服务器和斐讯N1都执行同样的步骤
- WG安装
$ sudo add-apt-repository ppa:wireguard/wireguard
$ sudo apt-get update
$ sudo apt-get install wireguard
-
生成密钥
通过 wg 脚本生成公钥和私钥。私钥自用,公钥给到对端使用,跟ssh免密码登录类似
$ wg genkey | tee privatekey | wg pubkey > publickey
-
打开ip forword
在 /etc/sysct.conf文件中,打开 ip forward
# Uncomment the next line to enable packet forwarding for IPv4
net.ipv4.ip_forward=1
# Uncomment the next line to enable packet forwarding for IPv6
net.ipv6.conf.all.forwarding=1
系统配置
-
云服务器
服务端只需配置[Interface]即可,[Peer]端的配置可由 wg set 命令完成添加
注意 AllowedIPs 的子网掩码需要使用/32,不然会造成多条Peer间的路由冲突
################################
[Interface]
Address = 192.168.100.1/24  ##服务端IP
## DNS = 1.1.1.1
PrivateKey = [ServerPrivateKey]  ##服务端私钥
ListenPort = 51820
PostUp = iptables -A FORWARD -i %i -j ACCEPT; iptables -t nat -A POSTROUTING -o eth0 -j MASQUERADE
PostDown = iptables -D FORWARD -i %i -j ACCEPT; iptables -t nat -D POSTROUTING -o eth0 -j MASQUERADE
SaveConfig = false   ## 通过wg命令更改的配置保存到配置文件

[Peer]
# Home N1
PublicKey = [Peer#1PublicKey]
AllowedIPs = 192.168.100.5/32, 192.168.8.0/24


[Peer]
# Office N1
PublicKey = [Peer#4PublicKey]
AllowedIPs = 192.168.100.7/32, 192.168.7.0/24
##################################
-
Home N1配置
/etc/wireguard/wg0.conf
[Interface]
Address = 192.168.100.5/24
PrivateKey = [PrivateKeyPeer#1]

[Peer]
PublicKey = [ServerPublicKey]
#PresharedKey = [PresharedKey]
Endpoint = some.domain.com:51820
AllowedIPs = 192.168.100.0/24, 192.168.7.0/24  ##100.0是wg网络,7.0是对端的Office网络
# if you want to do split tunnel, add your allowed IPs
# for example if your home network is 192.168.1.0/24
# AllowedIPs = 192.168.1.0/24

# This is for if you're behind a NAT and
# want the connection to be kept alive.
PersistentKeepalive = 25
-
Office N1配置
/etc/wireguard/wg0.conf
[Interface]
Address = 192.168.100.7/24   ### 客户端IP
PrivateKey = [PrivateKeyPeer#2]

[Peer]
PublicKey = [ServerPublicKey]
Endpoint = nj.tister.cn:51820
AllowedIPs = 192.168.100.0/24,192.168.8.0/24  ##100.0是wg网络,8.0是对端的Home网络
# if you want to do split tunnel, add your allowed IPs
# for example if your home network is 192.168.1.0/24
# AllowedIPs = 192.168.1.0/24

# This is for if you're behind a NAT and
# want the connection to be kept alive.
PersistentKeepalive = 25
启动端口
wg-quick up wg0
把wg服务加入自启动
$ sudo systemctl enable wg-quick@wg0.service
$ sudo systemctl start wg-quick@wg0.service
mac book配置
###################################
[Interface]
PrivateKey = [PrivateKeyPeer#1]
Address = 192.168.100.2/24
#DNS = 114.114.114.114
#MTU = 1420

[Peer]
PublicKey = [ServerPublicKey]
Endpoint = some.domain.com:51820
AllowedIPs = 192.168.100.0/24,192.168.8.0/24,192.168.7.0/24  ## 把wg网络、Home网络、Office网络都加到wg0路由中
PersistentKeepalive = 25
########################################
启动端口
wg-quick up wg0
路由配置
- Home路由器配置 增加两条静态路由:
route add -net 192.168.100.0/24 gw 192.168.8.5
route add -net 192.168.7.0/24 gw 192.168.8.5
- Office路由器配置 增加两条静态路由:
route add -net 192.168.100.0/24 gw 192.168.7.20
route add -net 192.168.8.0/24 gw 192.168.7.20
其它相关命令
查看路由表
# 查看系统路由表 linux
$ ip route show table main
$ ip route show table local

# 查看路由表 mac
$ netstat -nr

# 获取到特定 IP 的路由
$ ip route get 192.0.2.3
查看wg状态
sudo wg show ## 等同于 wg
#########################################
peer: Peer #1
  endpoint: 192.168.2.1:50074
  allowed ips: 10.0.0.2/32
  latest handshake: 4 minutes, 16 seconds ago
  transfer: 57.58 KiB received, 113.32 KiB sent

peer: Peer #2
  endpoint: 99.203.28.43:36770
  allowed ips: 10.0.0.10/32
  latest handshake: 5 minutes, 30 seconds ago
  transfer: 92.98 KiB received, 495.89 KiB sent
##################################################
启用/停止wg0接口
wg-quick up wg0
wg-quick down wg0
启用/停止 Wireguard服务
$ sudo systemctl stop wg-quick@wg0.service
$ sudo systemctl start wg-quick@wg0.service
加入Peer
wg set wg0 peer <client_pubkey> allowed-ips 10.0.0.x/32
保存配置
wg-quick save wg0
生成QR Code
qrencode -t ansiutf8 < /etc/wireguard/wg0.conf